How to get the most out of Elation Go: The Mobile App for Practices
We’re excited to share details of the newly launched Elation Go app for our users.
Elation Go, is a secure communication app that extends the value of our EHR by providing a mobile-platform that enables providers and practice staff to more efficiently and effectively manage patient panels and perform practice activities.
With Elation Go, users can now:
- Securely upload documents into patient charts directly from your mobile device
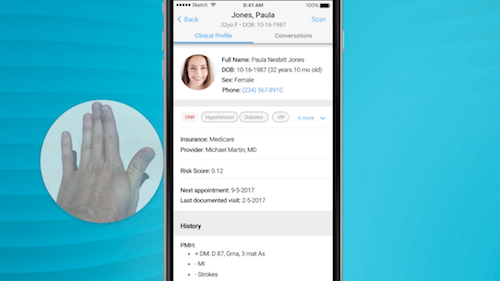
- Quickly access the clinical profiles of patients with upcoming appointments
- Capture profile photos of your patients and upload them directly into their charts
- Easily compose and reply to patient letters when it’s top of mind to minimize disruptions in your day
- Receive Push Notifications to quickly know when you have a new patient letter
- Easily call patients or other providers on the Care Team to seamlessly collaborate across the care continuum
Once you download the app in the iOS App Store, you will be able to log in with the same credentials you use when logging into Elation on a regular browser.
How can I upload patient profile photos?
To upload a patient’s profile photo, search for the patient in question and open their profile in the mobile app. When you click on the patient’s portrait, you will be given the option to “Take Photo” or “Remove Photo”. Once you’ve taken the photo, you’ll want to position the photo so the patient’s face is in the middle of the photo square, then click “Use Photo”
How can I scan and upload documents directly into a patient’s chart?
To scan and upload a document direct into a patient’s chart, search for the patient and open their profile in the mobile app. Click on “Scan” in to the top right corner, and you will be guided to capture images of the document with their phone camera. You can take up to 20 pages for a single document. Once all of the photos are taken, you can rearrange the order of the pages by holding on the image and dragging it to the desired position/order. You can also take the image to take a closer look at it, rotate the image, and/or delete the image. Once you’re satisfied with the images, click on “Next” to complete the following document details:
- Reviewer
- Date
- Document Type
- Tags (optional)
- Title (optional)
- Mark Urgent
- File on behalf of Reviewer
Once you’ve added the document details, click on “Upload” to file the document into the patient’s chart. The images below will give you a better idea of what the document upload process looks like. To view the uploaded document, go to the patient’s chart on the Elation Desktop App.
How do I send a message via the app?
To send a message, click the New Message icon in the center of the tab bar at the bottom of the page (screenshot below). You’ll then be asked who you want to send your letter to, and be given the option to select from a list of your panel.
Learn more about Elation Go and its features here. Still have questions? Email support@elationemr.com and we’d be happy to help!


