Part 2: Understanding standard and custom blocks
This article describes the standard blocks that are available to all users and provides instructions on how to create custom blocks.
Table of contents:
Overview
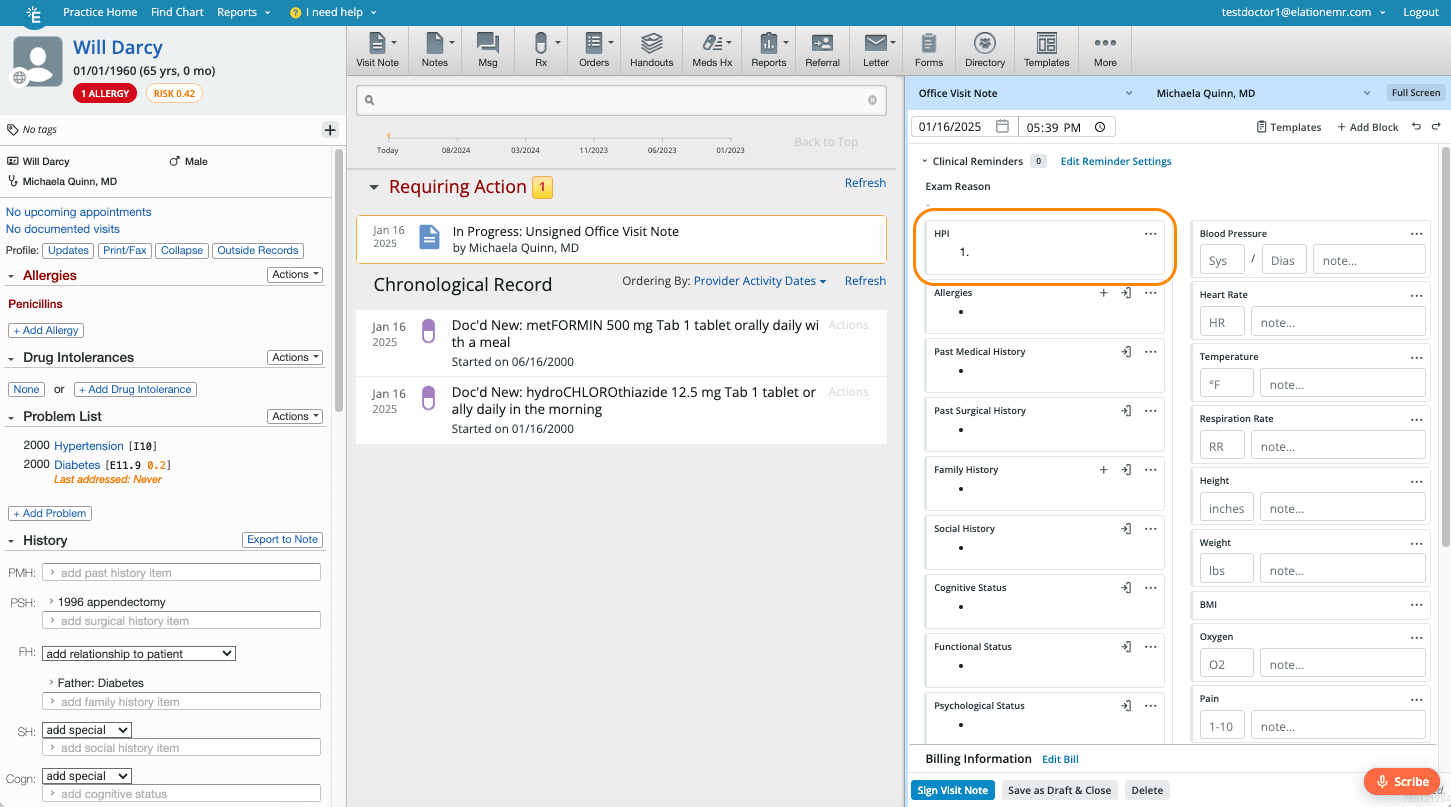
A block is a basic unit within Visit Note 2.0 that represents a section of the note. Blocks can be added and removed from a note depending on what you need to document for the visit.
|
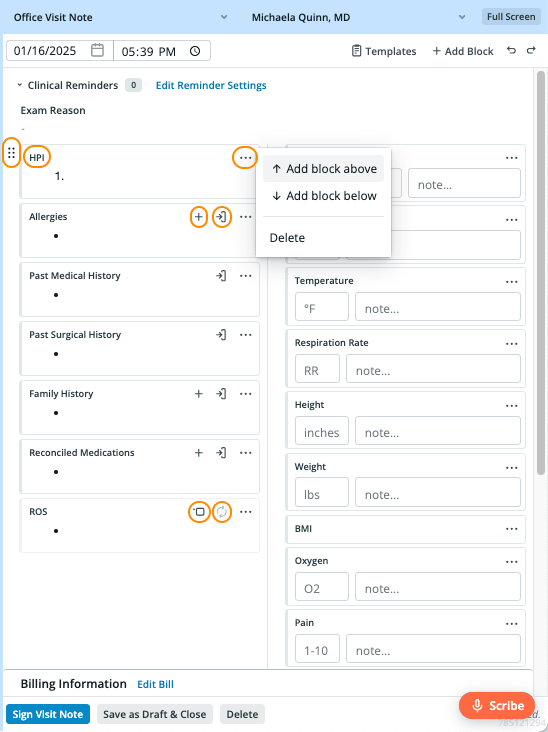
The top of each block includes:
A subset of blocks feature these additional icons:
|
 |
There are both standard blocks which are built and maintained by Elation and custom blocks that your practice can create to capture any type of structured data.
Standard blocks
There are 40 standard blocks created by Elation that represent the common parts of a SOAP note.
This table below contains a summary of:
-
the name of each standard block,
-
whether the block appears in Note 2.0 by default,
-
whether the block can be added more than once to the note, and
-
the actions users can perform within the block.
Blocks for the Subjective
|
Block name |
This block is included by default in a new note. |
A user can add this block multiple times to a note. |
Outcome when the block is added… |
|---|---|---|---|
|
HPI |
✔️ |
❌ |
Adds a blank box where users can:
|
|
Allergies (from clinical pr) |
✔️ |
❌ |
Adds a block that imports content from the corresponding section of the Clinical Profile. Note: Clinical Profile content will only get imported if the block is manually added by a user, not when the note is initially created. Users can also type details directly into these blocks. |
|
Exercise history (from clinical pr) |
✔️ |
❌ |
|
|
Family history (from clinical pr) |
❌ |
❌ |
|
|
Functional status (from clinical pr) |
✔️ |
❌ |
|
|
Habits (from clinical pr) |
✔️ |
❌ |
|
|
Diet (from clinical pr) |
✔️ |
❌ |
|
|
Past medical history (from clinical pr) |
❌ |
❌ |
|
|
Past surgical history (from clinical pr) |
✔️ |
❌ |
|
|
Psychological status (from clinical pr) |
✔️ |
❌ |
|
|
Reconciled medications (from clinical pr) |
✔️ |
❌ |
|
|
Social history (from clinical pr) |
❌ |
❌ |
|
|
Cognitive status |
✔️ |
❌ |
Adds a blank block where users can:
|
|
Family history (blank) |
✔️ |
❌ |
|
|
Past medical history (blank) |
✔️ |
❌ |
|
|
Past surgical history (blank) |
✔️ |
❌ |
|
|
Social history (blank) |
✔️ |
❌ |
|
|
Review of systems |
✔️ |
❌ |
Adds a blank block where users can:
|
Blocks for the Objective
|
Block Name |
This block is included by default in a new note. |
A user can add this block multiple times to a note. |
Outcome when a user adds this block to a note… |
|---|---|---|---|
|
Blood pressure |
✔️ |
✔️ |
Adds a blank block where users can:
|
|
BMI |
✔️ |
❌ |
|
|
Heart rate |
✔️ |
✔️ |
|
|
Height |
✔️ |
❌ |
|
|
Oxygen saturation |
✔️ |
❌ |
|
|
Pain scale |
✔️ |
❌ |
|
|
Respiration rate |
✔️ |
❌ |
|
|
Temperature |
✔️ |
❌ |
|
|
Weight |
✔️ |
❌ |
|
|
Vitals |
❌ |
❌ |
Adds the following blank blocks simultaneously: blood pressure, BMI, heart rate, height, oxygen saturation, pain scale, respiration rate, temperature, and weight Users can:
|
|
Physical exam |
✔️ |
❌ |
Adds a blank block where users can:
|
|
Data |
❌ |
❌ |
Adds a blank block where users can:
|
Blocks for the Assessment and Plan
|
Block Name |
This block is included by default in a new note. |
A user can add this block multiple times to a note. |
Outcome when a user adds this block to a note… |
|---|---|---|---|
|
Assessment & Plan (blank) |
✔️ |
❌ |
Adds a blank block where users can:
|
|
Procedures administered |
✔️ |
❌ |
Adds a blank block where users can:
|
|
Care plan |
✔️ |
❌ |
Adds a blank block where users can:
|
|
Follow up |
✔️ |
❌ |
Adds a blank block where users can:
|
|
Lab order |
❌ |
✔️ |
Creates a placeholder that allows the user to trigger the lab order form. |
|
Imaging order |
❌ |
✔️ |
Creates a placeholder that allows the user to trigger the imaging order form. |
|
Prescription |
❌ |
✔️ |
Creates a placeholder that allows the user to trigger the prescription form. |
|
Referral |
❌ |
✔️ |
Launches the Referral form. |
Deep dive on Dx code and CPT code commands
The Dx code and CPT commands behave differently from our other standard blocks. Instead of adding a boxed section to the draft, these commands allow the user to search for and add codes to the note.
|
The Dx code command allows the user to search through an IMO library of diagnoses by description or ICD-10 code. Once a diagnosis is added to the draft, the user will see the ICD-10 code as a tag (or multiple tags if the diagnosis involves bundled codes). The user can hover over the tag to see the code’s formal description, and optionally click on the tag to add this description to the note. |
 |
| The CPT code command allows the user to search through any codes that they saved to their Popular CPT codes settings by description or by code. |  |
Even though they can technically be inserted anywhere in the draft, the Dx code command is intended to be used in the Assessment & Plan block and the CPT code command is intended to be used in the Procedures block. Any codes that are added to the draft blocks through these commands will simultaneously be added to the Billing Form of the note.
Dynamic Macros
Dynamic Macros behave differently from standard blocks. Instead of adding a boxed section to the draft, Dynamic Macros allow the user to insert real-time patient data into their visit note.
Use the @ shortcut to insert dynamic fields into any standard block or text field while drafting your visit note. Any @ fields in a Visit Note Template with dynamic macros will automatically populate with the patient’s data.
- Clinical Profile (Allergies)
- Bulleted list of Active Allergies from the patient's clinical profile.
- Clinical Profile (Medications)
- Bulleted list of Active Permanent Medications from the patient's clinical profile.
- Clinical Profile (Problems)
- Bulleted list of Active Problems from the patient's Clinical Profile Problem List.
- Patient age
- Patient's age at the time of visit.
- Patient DOB
- Patient's Date of birth.
- Patient name
- Patient's Legal first name, Middle name & Legal last name.
| ⚠️ Dynamic macros cannot be used in custom blocks, Vitals fields, structured PE and ROS fields or anywhere outside of the Note 2.0 draft or template builder. |
Custom blocks
Custom blocks enable practices to create meaningful groups of input fields such as checkboxes and dropdowns for capturing structured data. Use them to capture data in a consistent and standardized way, ensure user adherence to care protocols, and facilitate downstream reporting.
Once custom blocks are set up, they can be added directly to a Note 2.0 draft or incorporated into Note 2.0 templates. Follow the instructions below to create your own custom block.
Workflow instructions
Creating a custom block
-
In the blue navigation bar at the top of your Elation account, click your email address followed by Settings.
-
In the left-hand navigation menu, click the Custom Blocks page.
|
|

-
Click any of the buttons in the yellow menu to add sections to your custom block. (Details about each section are included below.)
-
When the selected section appears, fill out the associated fields for the selection.
-
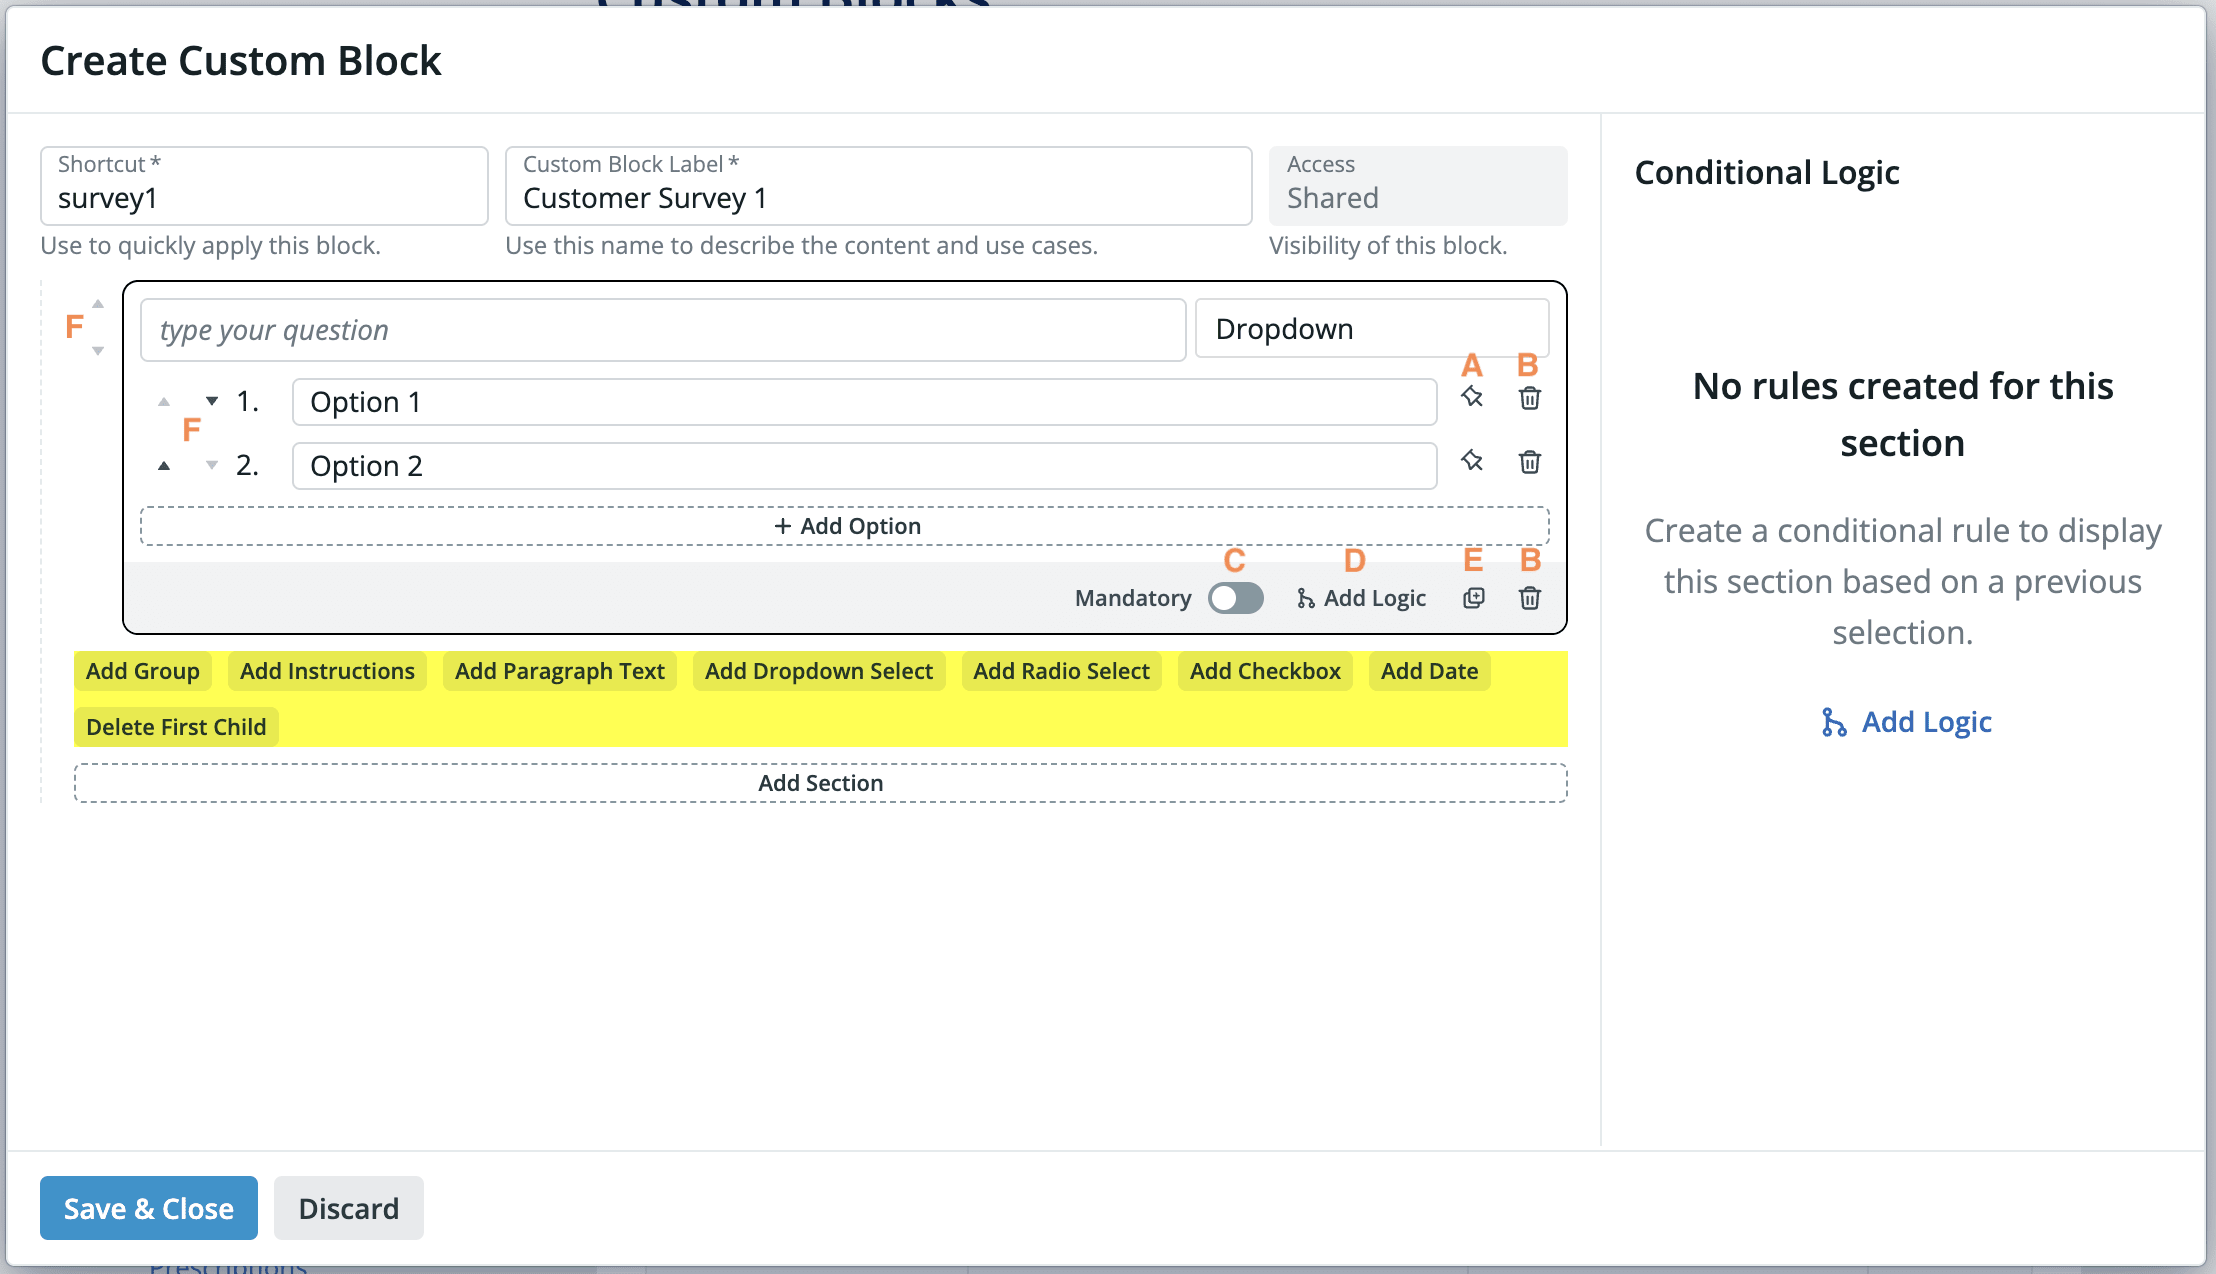
Within each section you can optionally use the following icons:
|
Pin icon (A): used to define an answer choice that will be selected by default. |
|
|
Trash can icon (B): used to delete an answer choice or the section entirely. |
|
|
Mandatory toggle (C): when this toggle is turned “on”, we’ll display an asterisk next to the prompt and include it in a count of mandatory fields at the top of the block as a reminder. Important: Providers will still be able to sign the visit note without completing fields that are set to mandatory. |
|
|
‘Add Logic’ button (D): allows the user to configure conditional logic so that the component is only shown if the user responds to an earlier section in a certain way. Conditional logic can be applied to Dropdown Select, Radio Select and Checkbox sections. |
|
|
Copy icon (E): used to duplicate the section. |
|
|
Sort arrows (F): used to change the order of sections or answer choices. |
|


-
Click Save & Close to complete.
Editing a custom block
-
Locate the custom block on the settings page.
-
Click the pencil icon.
-
Make edits in the pop-up window.
-
Click Save & Close.
Deleting a custom block
-
Locate the custom block on the settings page.
-
Click the trash can icon.
Adding a custom block directly to a draft note
Refer to these user instructions to learn how to deploy a block within Note 2.0.
Adding a custom block to a template
Refer to these user instructions to learn how to add a block to a Note 2.0 template.
Deep dive on custom block sections
Below is an example of a custom block. On the left, it’s shown in the custom block builder, and on the right, you can see how its been filled out by a user in the visit note. Learn about the labeled sections using the table beneath the image.

|
Section name |
Section behavior |
|
Dropdown Select (A) |
Allows the user to add a question that will show a dropdown menu of multiple options, but only accept one response. Users can use the pin button to indicate a default value. |
|
Checkbox (B) |
Allows the user to add a question that will show checkbox options. Click + Add Option to insert additional checkboxes. Users can check any checkbox options to indicate a default selection. |
|
Group (C) |
Adds a heading and allows you to group a set of components together. |
|
Paragraph Text (D) |
Allows the user to add a question prompt that accepts a free-text response. Users can also enter a default value to appear. |
|
Date (E) |
Allows the user to add a question prompt that will show a date picker option. Users can enter a date to indicate a default value. |
|
Radio Select (F) |
Allows the user to add a question that will show multiple options, but only accept one response. Users can use the pin button to indicate a default value. Printout will show options (unlike the Dropdown and Checkbox sections). |
|
NestedLayout (G) |
Creates an indentation so you can embed a component beneath another one |
|
Instructions (H) |
Allows the user to enter free-text as instructions that will only appear when the visit note is in a draft state. Instructions will not appear after the note is signed. |
Additional Reading
Up next:
Additional reference: